WOI Guides
Pullbacks & Retests — Healthy vs Weak
How to interpret pullbacks after a move: higher-low structure, retest quality, and where most traders get chopped.
In this guide
What a pullback should look like in strength
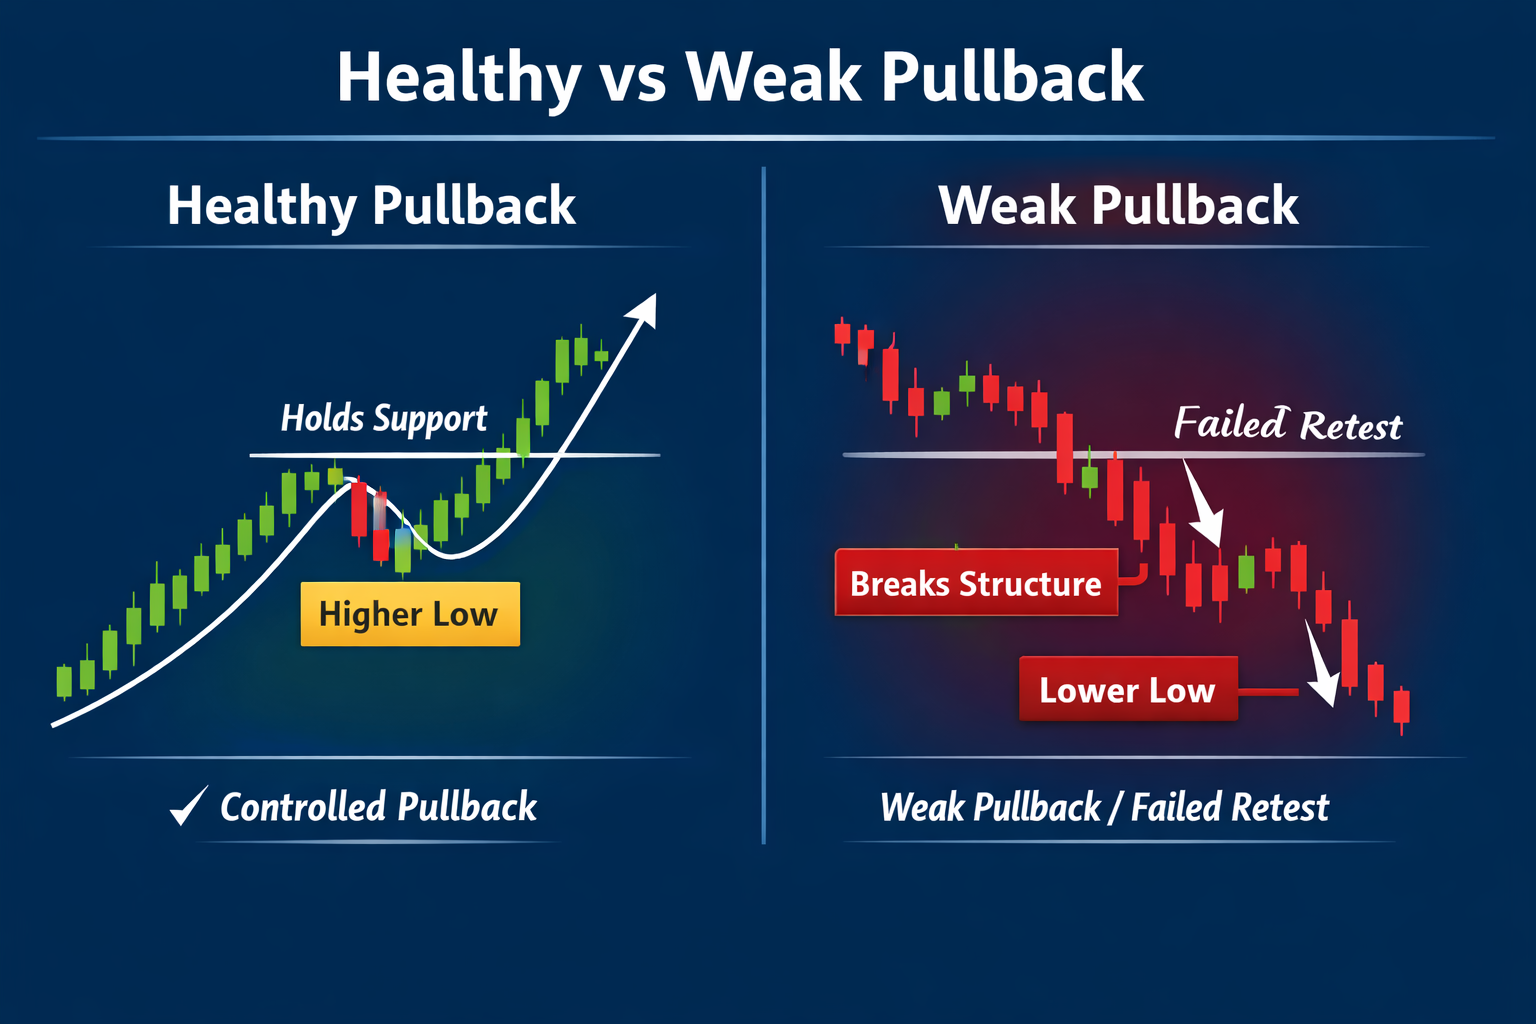
A healthy pullback usually looks controlled rather than emotional. Instead of collapsing back through the whole prior move, price tends to retrace in an orderly way, hold above an important area, and preserve the broader trend structure. In strong trends, pullbacks often feel uncomfortable to weak hands but still remain technically constructive.
- A healthy pullback respects a prior support zone, reclaimed breakout level, or important moving average.
- It usually forms a higher low relative to the prior swing low in an uptrend.
- Volatility often contracts during the pullback, which suggests less aggressive selling.
- The best pullbacks look like pauses inside strength, not like full trend failures.
- A controlled retracement is often more constructive than a sharp emotional selloff.
Why healthy pullbacks exist
Pullbacks are a normal part of trends. Markets do not move in straight lines forever. After a strong move, some traders take profits, late buyers hesitate, and price rebalances before the next decision point. A healthy pullback often refreshes the trend by shaking out weak participants and creating a better location for continuation.
- Profit-taking naturally appears after strong directional moves.
- Healthy trends often need pauses before continuing.
- Pullbacks can reset short-term overextension and improve future reward-to-risk.
- A constructive pullback often attracts buyers who missed the first move.
- Not every pause is weakness; many are just rebalancing phases.
Shallow vs deep pullbacks
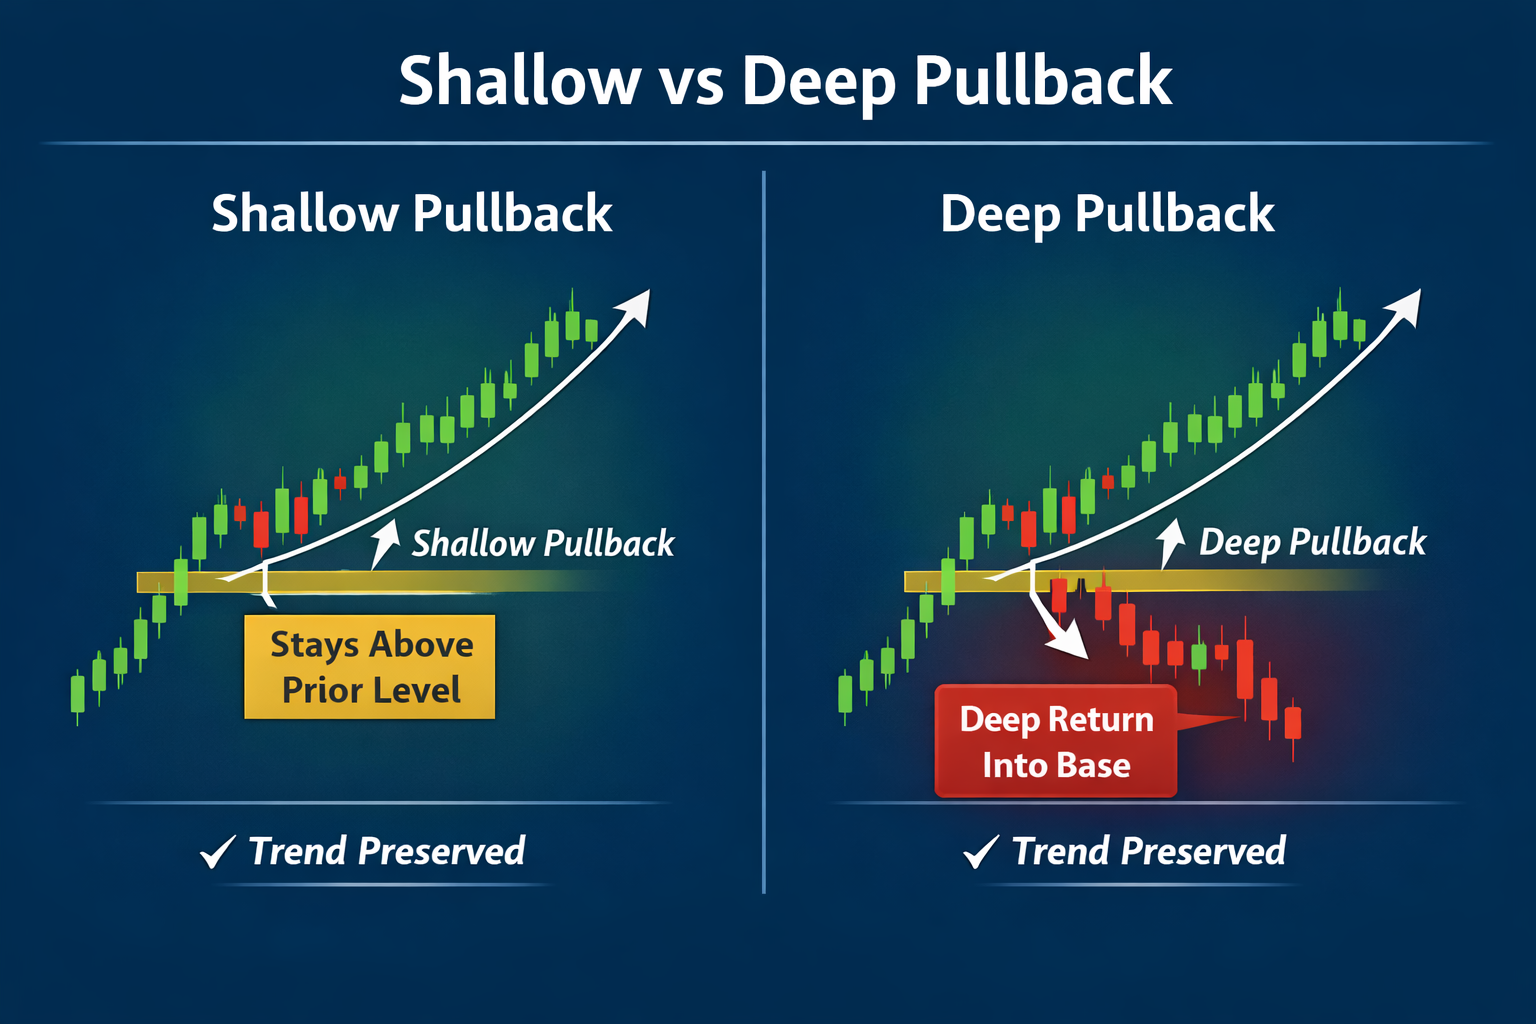
The depth of a pullback matters. Shallow pullbacks usually suggest strong demand because sellers cannot push price very far down. Deep pullbacks may still work, but they require more caution because they indicate stronger opposing pressure. Traders should not judge pullbacks only by percentage retracement; context, structure and reaction quality matter more.
- Shallow pullbacks often reflect strong trend conditions.
- Deep pullbacks may still be tradable but usually carry more uncertainty.
- A deep retracement that still preserves higher-low structure can remain constructive.
- If price returns too deeply into the old base, continuation becomes less convincing.
- The reaction at the zone matters more than the retracement amount alone.
Weak pullback signs
Weak pullbacks often lose the key feature of a healthy retracement: control. Instead of drifting into support and stabilizing, price tends to break structure, lose acceptance, or show repeated failed reclaim attempts. Traders should treat these as warning signs rather than automatically assuming the dip will recover.
- A sharp drop back into the base often signals quick loss of acceptance.
- A break of the last higher-low structure is a meaningful warning sign.
- Repeated failure to reclaim the broken level often suggests the move is weakening.
- Heavy downside momentum during the pullback usually deserves caution.
- The more chaotic the retracement becomes, the less attractive it is as a continuation setup.
Retest vs failed reclaim
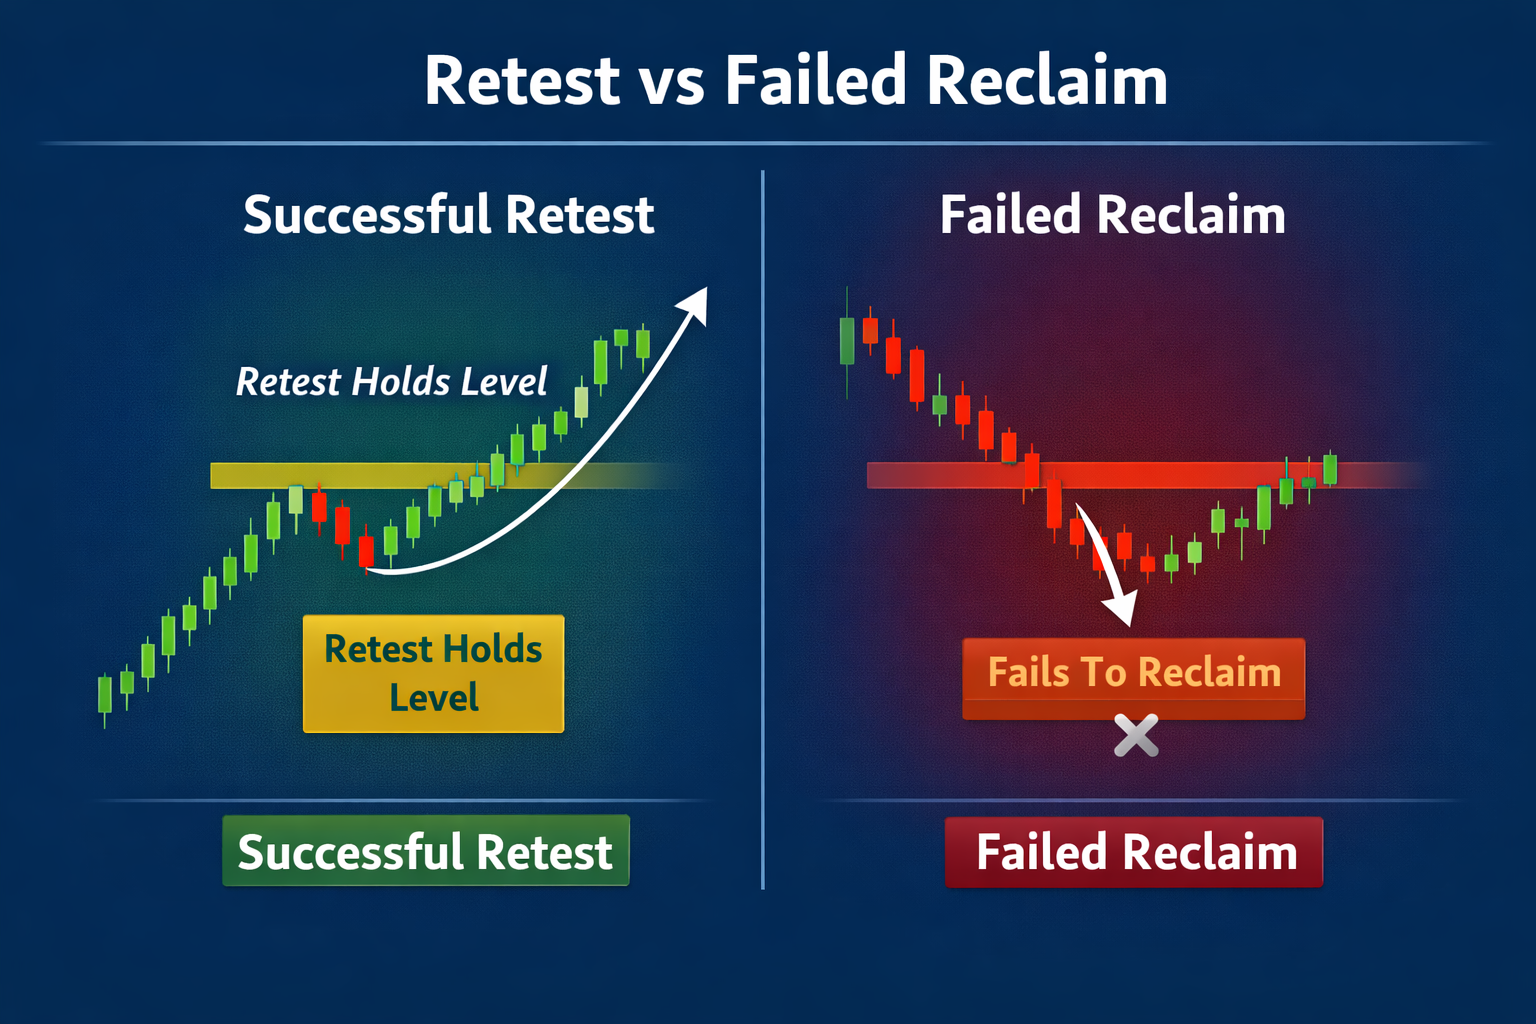
A retest and a failed reclaim can look similar at first, but they lead to very different outcomes. A successful retest holds the reclaimed zone and then starts to stabilize or bounce. A failed reclaim briefly revisits the area but cannot hold it, which often turns the old support back into resistance. Traders need to watch what price does after the retest, not just where it touched.
- A successful retest usually holds the reclaimed zone and attracts new buyers.
- A failed reclaim often loses the level quickly and struggles to recover it.
- The first bounce matters less than whether price can maintain acceptance afterward.
- Multiple failed reclaim attempts are usually a negative sign.
- Good retests tend to look orderly; failed reclaims often look rushed and unstable.
Practical approach
A practical pullback strategy starts with context and location. Traders usually want the pullback to happen into a meaningful area, not randomly in the middle of the chart. Confluence improves the setup: a reclaimed breakout level, prior pivot, moving average or higher timeframe zone can all strengthen the case. The key is to plan invalidation logically before the trade.
- Prefer pullbacks into zones with confluence such as a level, moving average and prior pivot.
- Define invalidation under the structure instead of relying on hope.
- If the retest fails, treat it as information rather than a personal mistake.
- A good location often matters more than catching the exact lowest candle.
- The cleaner the structure, the easier the trade plan becomes.
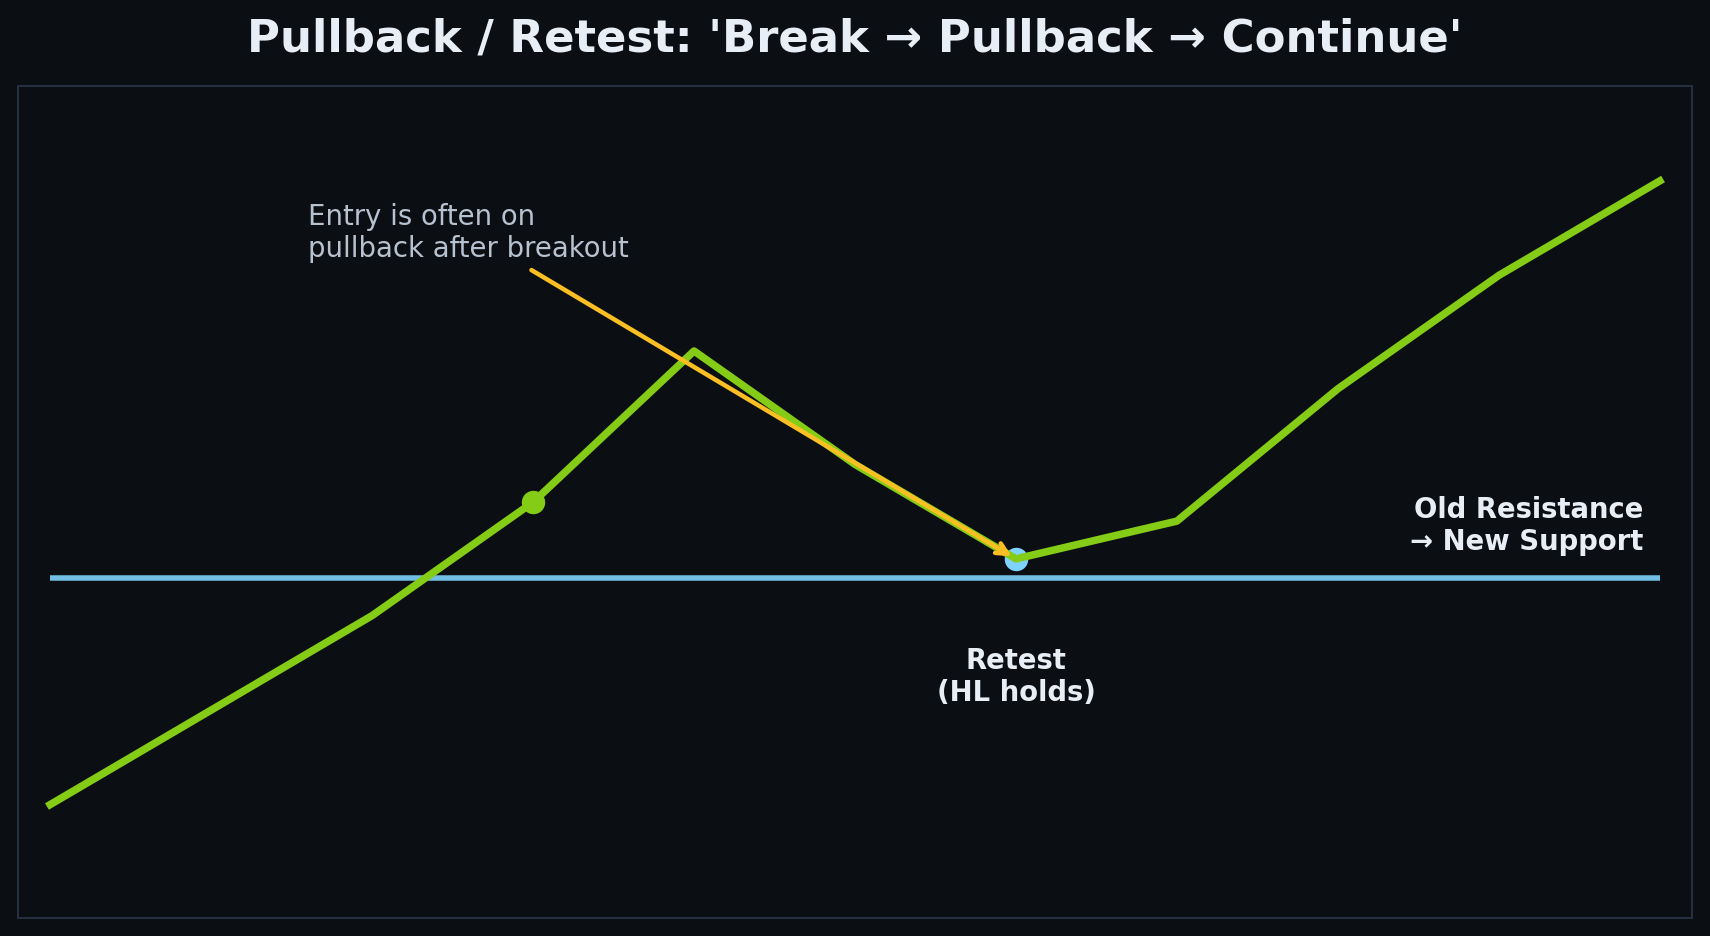
How traders actually plan pullback entries
Good traders do not blindly buy every dip. They usually ask whether the breakout or trend leg was real, whether the pullback is holding a meaningful zone, and where the trade idea clearly fails. Some will enter during the retest itself, while others wait for a small sign of stabilization before acting. The exact trigger matters less than the structure and risk plan around it.
- Some traders enter near support; others wait for a confirmation candle after the retest.
- Invalidation is usually placed below the structure that must hold.
- The next resistance or trend continuation leg helps frame the target.
- The pullback must fit the broader trend context, not just look attractive in isolation.
- A controlled entry with clear invalidation is better than emotional dip-buying.
Common mistakes
Most pullback mistakes come from impatience or from confusing any drop with opportunity. Traders often buy too early, ignore failed reclaim behavior, or enter in the middle of weak structure. Pullbacks should improve the trade location, not become excuses to fight clear deterioration.
- Buying every dip without checking whether the breakout actually held.
- Ignoring breaks of structure and calling everything a healthy retracement.
- Entering before price reaches a meaningful support or confluence zone.
- Using no clear invalidation if the retest fails.
- Treating failed reclaims as minor noise when they may signal trend weakness.
Checklist
Before trading a pullback or retest, it helps to ask a few simple questions. This usually keeps the focus on structure and acceptance instead of emotion.
- Did the breakout or prior move actually accept above the key level?
- Is the pullback shallow and controlled, or sharp and unstable?
- Do we hold the zone on retest?
- Is there a clear higher-low structure or is it already damaged?
- Where is the clean invalidation if the retest fails?
Apply this in WOI
Open the scanner, pick one symbol, and practice:
mark zones, decide trend regime, and write one invalidation level.
The goal is a repeatable process, not perfect predictions.
Disclaimer: Educational content only. Not financial advice.